
Romualdo Dasig February 11, 2017

This project is an enhancement to my previous project which was about controlling room temperature in order to save on electric bills while learning the basics about Arduino.
Parts List
| Image | Description | Qty | Buy |
|---|---|---|---|
| Arduino Uno | 1 | Buy | |
| DHT11 Temperature and Humidity Sensor | 1 | Buy | |
| LM1602C 16x2 LCD Display | 1 | Buy | |
| 10K Trimmer | 1 | Buy | |
| 220 ohms 0.25W Carbon Film Resistor | 3 | Buy | |
| 1K 0.25W Carbon Film Resistor | 4 | ||
| 10K 0.25W Carbon Film Resistor | 2 | Buy | |
| CNY17-1 Optocoupler | 2 | Buy | |
| 2N2222 | 2 | ||
| 1N4007 General Purpose Diode | 2 | Buy | |
| Blue LED Display | 1 | Buy | |
| Red LED Display | 1 | Buy | |
| DC Motor | 2 | Buy | |
| USB Type A to Type B Cable | 2 | Buy | |
| Breadboard | 1 | Buy | |
| Jumper wires |
How It Works
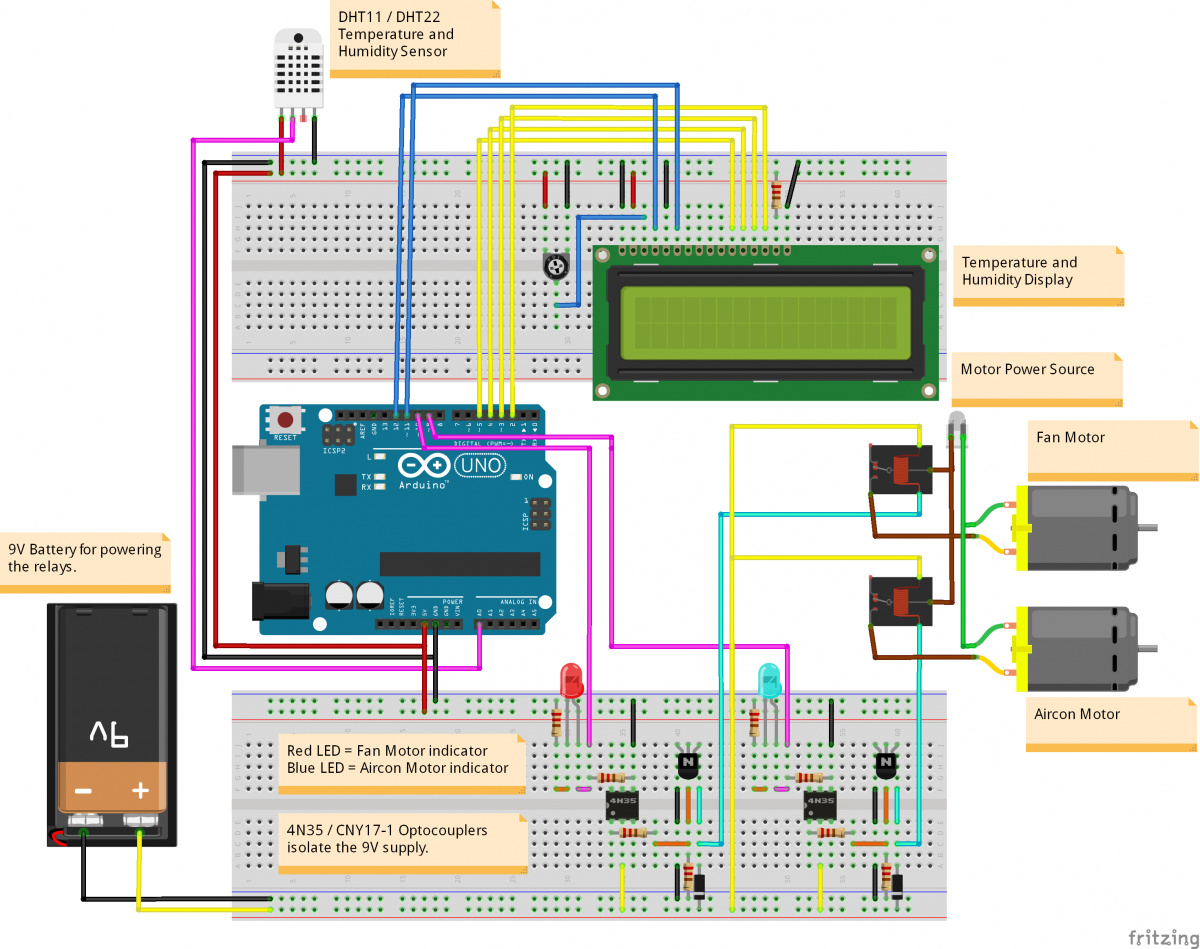
From the previous project, I've used a 7-Segment LED display which uses a lot of digital output pins. I could use a BCD to Decimal Converter/Driver to drive the LED displays but I think it is much better to use a 16x2 LCD Display which allows to display not just the temperature but also the humidity. This is quite better since it also allows me to put in a proper label.
The temperature will still be sensed through a DHT11 Temperature and Humidity Sensor which is less accurate than the new DHT22 sensor. But this is good for just starting your first project.
This project was inteded to turn on and off an aircon fan and motor, but since I could not insert the relays into the breadboard, I just used two small DC motors for testing. The DC motors were powered by a separate 12V power supply and is triggered on and off by a combination of a CNY17-1 optocoupler and 2N2222 switching transistor. LEDs were also added as indicators if the fan or motor was triggered to run.
Source Code
Arduino sketch is available for download in GitHub at https://github.com/dasigr/TemperatureControl

